Navigation
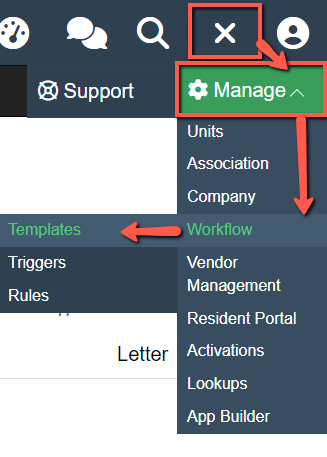
To access Workflow Templates, navigate to:
Settings > Manage > Workflow > Templates
Overview
Within the Workflow section, there are tabs for different template types, along with an Application selector to determine which module the template will be used in.
For this guide, ensure the “Customer Service” application is selected.
The Customer Service application allows you to create Email, Text, Voice, or Letter templates for use in the Communications module.
Note:
-
Templates cannot be used across modules.
-
Template functionality may vary by module.
-
The Communications module does not support Report or Note template types.
Email Templates
Selecting “New Template” from the Email tab opens the template creation window.
There are three main sections: Template Details, Merge Fields (Parameters), and the Email Editor.
Template Details
-
Application Type/Subtype: Identifies the module. This cannot be changed after creation. To use a different module, create a new template in that application.
-
Associations: Assign the template to one or multiple associations.
-
Name: This is how the template appears in the Communications module dropdown. Use clear naming conventions.
-
Reply-To: Enter an email address or merge field for responses.
-
To / CC / BCC: Enter email addresses or merge fields to define recipients.
-
For quick use, add the Homeowner Email merge field in the “To” field.
-
-
Attachments: Add files such as documents or flyers.
-
Subject: The email subject line visible to recipients.
-
Is Default: When selected, this template appears first when sending emails.
Merge Fields
Merge fields (parameters) automatically populate data from the system.
-
Commonly used fields include Homeowner merge fields.
-
To insert a field, click into a content area or field, then select the arrow next to the desired merge field.
Email Editor
Use this section to create and format the email body.
-
Supports merge fields, links, and images.
-
Functions similarly to Violations or ARC letter templates.
Text and Voice Message Templates
Selecting “New Template” from the Text Message or Voice Message tabs opens the template creation window.
There are three main sections: Template Details, Merge Fields (Parameters), and the Text Editor.
Template Details
-
Application Type/Subtype: Cannot be changed after creation.
-
Associations: Assign to one or multiple associations.
-
Name: Appears in the Communications module dropdown. Use consistent naming.
-
To: Enter a phone number or merge field.
-
For efficiency, use the Homeowner Phone/Text merge field.
-
Merge Fields
-
Automatically populate data from the system.
-
Commonly used fields include Homeowner merge fields.
-
Insert fields using the arrow selector after clicking into a field or content area.
Text Editor
-
Create the message body.
-
Supports merge fields.
-
Formatting is limited—keep messages concise and simple.
Letter Templates
Selecting “New Template” from the Letter tab opens the template creation window.
There are three main sections: Template Details, Merge Fields (Parameters), and the Letter Editor.
After the initial save, select “Preview PDF” to review formatting.
Template Details
-
Application Type/Subtype: Cannot be changed after creation.
-
Associations: Assign to one or multiple associations.
-
Name: Appears in the Communications module dropdown. Use clear naming conventions.
Merge Fields
-
Automatically populate system data.
-
Commonly used fields include Homeowner merge fields.
-
Insert fields using the arrow selector after clicking into a field or content area.
Letter Editor
-
Create the body, header, and footer of the letter.
-
Supports merge fields, links, and images.
Header/Footer Configuration:
-
Adjust field sizes to ensure proper fit within the template.
-
Use Preview PDF to validate formatting.
Note:
Ensure all required homeowner address fields are included so the letter is delivered correctly.
Using Templates in the Communications Module
Step 1
Select the homeowners who will receive the communication.
Utilizing the Templates
The section below will go over how to select your templates in the communications module to send to homeowners.
Step 2
Choose the desired communication method (Email, Text, Voice, or Letter).
Step 3
In the popup window, select the appropriate template from the Template dropdown.
Step 4
Review and update any necessary information, then select “Send.”
A confirmation message will appear in the bottom-right corner indicating the communication has been sent or queued.