
When creating a work order.
- Specify what it is for: A work order is either for an amenity (Clubhouse, Pool, Lightpost) or Unit (Jim Brown).
- Specify what needs repaired: The Category and Sub Category helps define this (Examples of Category – Sub Category: “Carpet – Cleaning” or “Walls – Painting” or “Pool – Chlorine Check”)
- Include Work Order Details:

NOTE: When creating a Work Order, you must choose if this is on a Unit or an Amenity
Amenities: Physical vs. Floating
(Menu Location: Work Orders > More > Association Settings > Amenity Setup)
Physical: These are amenities that are unique to this association. You can almost put a physical address on them. Set these up for each association. (Hint: think of adding things like Pools, Ponds, Clubhouse, Tennis Courts, Front Gate, Golf Course, etc.)
Floating: These are issues that occur in common areas that are harder to pinpoint. When a floating amenity work order is created, you are allowed to place it exactly where the issue is occurring. This is very helpful for vendors to find the exact location, plus this keeps your map from getting cluttered, since floating only stay on the map through the duration period of the work order. (Hint: examples of good floating amenities are lampposts, sprinklers, fences, feces, snow piles)
Categories and Subcategories
(Location: Work Orders > More > Management Settings > Categories or Subcategories)
These are characteristics of the work order and if setup correctly will help in reporting and management of work orders across all associations. (Warning: don’t add HOA specific items here; categories show up for all HOAs)
Near future enhancement: We plan to add the ability to link associations to categories. That way if you need a category specific to condos then you can select those associations that apply.
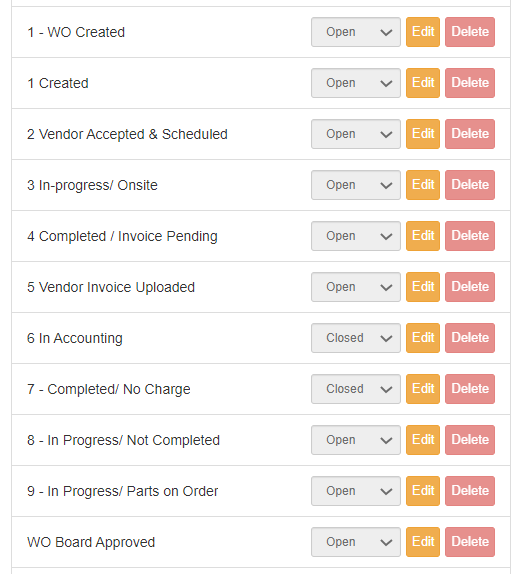
Statuses
(Menu Location: Work Orders > More > Management Settings > Statuses)
It is very important to get this right during initial setup of a management company. These, like most items in Work Orders, are global lists across all HOAs. Statuses help track the work order from creation to completion to billing and closure. Each customer can have a different process and therefore should be set up based on what is best for the whole management company (not specific to each HOA).
Our standard Statuses (Notice how a work order can be Open or Closed. These are set based on the status. You can see that Vendor Invoice Received and Vendor Paid and a few others will close the work order, but others will keep the work order open)

Filtered Views
Filtered Views are critical: Be sure you understand how to view work orders The flexibility is powerful, but can be hard to get right if you don’t understand them.
(Menu Location: Work Orders > More > Management Settings > Filtered Views)
A Filtered View is a group or bucket of work orders that show up in menus or tabs. Filtered Views display a list of work orders based on certain criteria. Each Filtered View can use logic to determine what work orders to show in that tab.
For each Filtered View, you can:
- Specify what columns in the grid to show, column order, sort order, and column widths.
- Specify which roles can see it
- Specify if it is for the current association or all associations
- Show, hide, or make read-only every field in the work order when viewing the work order from this view
- Set specific criteria or rules (example: Status LIKE Approved or Name LIKE Landscape)
Examples on where filtered views show:
Simplified Setup:
More Complex Setup:
Configuring Filtered Views:
Filtered Views also dictate what vendors or maintenance techs can view while in the field using the mobile app called “Smartwebs Portal”.
Notice how the image to the right shows “Open Vendor Invoices” on the mobile app.
Here are some suggestions on how to setup your filtered views. (Note: currently the order in which you set up these views will dictate the order you see them in the list, so create these in the order you want to see them.)
Suggestions for your Admin or Internal Staff (These can be across all associations and management roles):
- Open (open)
o These are open and vendor unassigned. Note: These could come from residents and set as a pre-work order
- Assigned (open)
o These have been reviewed by internal staff and assigned to a vendor.
- Working (open)
o These are actively being worked by the vendor or internal maintenance crew. Typically customers like setting up their internal staff as vendors, to keep them consistent with other vendors.
- Invoice Pending (open)
o The vendor has completed the work order and now needs to upload an invoice.
- Invoice Received (open)
o This list indicates those that need paid.
- Invoice Paid (closed)
o These are closed work orders where the invoice was paid.
- All
o This is a list of all work orders across all associations. This is used so you can quickly find, search of view all work orders within the system.
Suggestions for your Vendors (These are across all associations and Vendor roles)
- Open Vendor
o Open Work Orders assigned to this vendor company.
- Invoice Pending Vendor
o The work order is still open, but the vendor has completed it and now needs to upload their invoice.
- Closed Vendor
o The work order is still open, but the vendor has uploaded their invoice
Examples of how to setup “Assigned” (this view is for management to see a list of open work orders where the vendor is assigned, but hasn’t started working on it):
- Navigate to Work Orders > More > Management Settings > Filtered Views
2. Click [+] to add a new filtered view:
3. Filtered Settings: Set the following values:
a. Filtered View Name: Assigned
b. Description: Displays all work orders “Assigned” to Vendors but they haven’t begun working it yet.
4. Rules: this is where you need to specify what work order info or details helps the system know if it belongs in this view or tab.
5. Roles: here is where you specify who can see this view. We want to just specify management personnel.
6. Form Settings: Here you can set which parts of the work order details and buttons you want visible, disabled or hidden. (In the screenshot below, notice how this view allows you to see who reported the issue but you cannot edit it. Also, this view wants the conclusion hidden.)
7. Grid Settings: Here you can change the order, width, visibility of each column
FAQs
What will allow the work order to jump between Filtered Views?
- Since we indicated this in the rules area when setting up the Filtered View, the Status of the work order will help dictate which ones show in each view.
Can you do complex, time-based notifications, like say, you want the vendor to be notified via text if the work order is set to Vendor Assigned for longer than 24 hours?
- Yes, this can be done with time-based triggers. Please see Triggers & Workflow
Work Order Details
Once a work order is created, you can email it, send a text or voice message based on it, export it, or schedule it for reoccurring maintenance.
If the work order is on a floating amenity, you will need to place it on the map at the best location. This map can then show up in an email to the vendor showing them precisely where the issue is located.
The vendor responsible for doing the work should be trained to update the Status and add comments. Here they can also add before and after pictures, provide details and conclusion.
Vendor Setup
You setup vendors by first creating the vendor company, then adding users to the vendor company.
Vendor Companies are linked to Categories, like you would want to tie “The Pool Man” vendor to Pools and Ponds, but not Lampposts or A/C.
Users are linked to Associations, like John Smith has access to Forest Lakes, but not Brushy Creek.
Warning: The Vendor company and user must be setup correctly before you can use this company in your work order system.
Steps:
- Navigate to Vendor Management either
a. Work Orders > Vendor Management
b. Gear > Manage > Vendor Management
2. Click the New button:
3. Toggle On “Will Need to Login or Manage Work Orders”
4. Add the company details and Categories this vendor will access:
- Add the user to this vendor
Click save and now you see the vendor user added to the Vendor Company … BUT YOU HAVE TO CLICK SAVE ON THE VENDOR COMPANY for the user to get saved to the company.