For a quick summary of the basic steps, please go to the "Quick Training - Online Submit Form" guide.
Introduction to Architectural Online Submit Forms
Online submission forms allow homeowners to submit their projects directly online via a link or Smartwebs Resident Portal.
When the homeowner submits the project online, it will automatically get sent to the Architectural module the staging area, and notify the property/community manager of its arrival. The community manager will then log in to the system and review the project for completeness prior to sending it on to the committee for review.
This document is designed to help an administrator get these forms up and running and available for use by the homeowners as quickly as possible.
Guide’s Intended Audience
Your local Global Administrator, an individual or group from within your company designated to help support and administer to your company the various products from the Smartwebs Compliance Suite, should use this guide to get Arc Online Forms set up.
Accessing the Online Submit Forms
You can access the administrative form site following the menu paths in ARC pictured below:
(ARC -> More -> Online Submit Form)
Note: if the menu options is missing, this could be because you do not have the right to access this section of the ARC module, please contact your Global Administrator.
ARC Top Menu
Icon View
Clicking on the link should take you to the following screen:
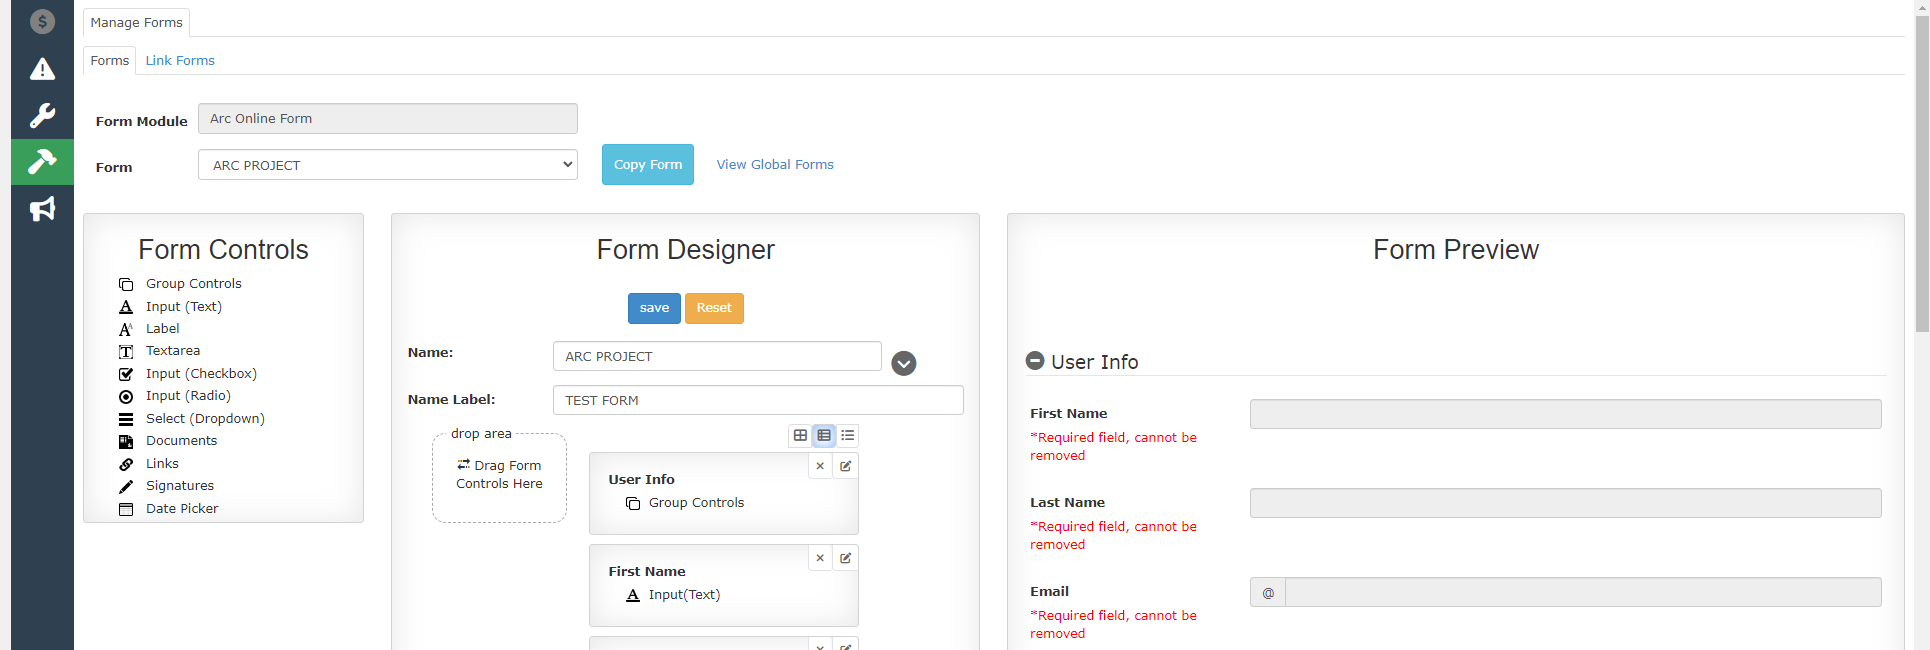
You will first build the online submit form in the “Forms” tab, then link that form to your associations via the “Link Forms” tab.
You can create as many forms as you would like and link them to your associations. You can also have more than one form per association. For example, you may want a form specific to Landscaping and a General Form for all other projects. However, in order to simplify things we recommend that you begin by creating a single generic form that you can apply to the majority of your associations. This will make your form easier to configure and manage and will save you time later.
Creating a Form
You will begin by copying from the Smartwebs Global Template then add to/modify the form from there. This form is already set up to ensure all the correct data elements are captured and passed properly over to the Arc Application.
Copying the Global Template
To copy from a global template:
- Click on “View Global Forms”
- Pick your Global Form from the dropdown
- Click “Copy Global Form”
(Note: the form should now appear in your Form dropdown. You are now free to modify this form.) About your copy of the global template form:
There has been a lot of work put into this template so that the user info and project types are linked to the proper form items and will pass back to the Arc Application appropriately. Please do not change these form elements … or do so cautiously. Please be aware that if our staff is required to manually reinstate portions of your global template form, applicable service fees may be incurred.
Modifying the Form
Now that you have the global form copied to your management company you can begin to modify it.
There are three areas to the form editor:
- Form Controls: these are your form elements that will appear on the form (e.g. Text Boxes you will have the homeowner complete, or Drop-Down Lists they will select from).
- Form Designer: you drag your form elements from the “Form Controls” section on to the “drop area” in the “Form Designer”. The form element will automatically get added to the bottom of the list. You can then drag that form element up the list to rearrange where it appears on the form.
- Form Preview: as you add/remove form elements from the “Form Designer” you can see how the form elements will appear on the form in this preview.
CAUTION: whenever you make changes to the form, don’t forget to click the “Save” button just below the “Form Designer” title. If you decide to start your changes over, you can click the “Reset” button to return to your last save point on this form.
Important tips when creating a form:
- Do not modify any of the fields in the User Info area. These need to stay as-is.
- Working around the basic form usually works best. You can add extra data entry fields, but they need to be in the project info area.
- Do not change or modify the project type field. You may add project types in the CCRs area. Also, you can add additional CCR articles info so that if a user chooses a specific project type, then the detailed bylaw requirements will be shown to the user/homeowner.
Form Controls
These controls can be dragged to the “Form Designer”. In the next section, we’ll explain each of these element controls.
General Info about Controls
All the controls can be edited from within the Form Designer by clicking on the edit link in the top left corner of the element control:

NOTE: to remove this element from the form, simply click on the X next to the edit link.
Read-only Before/After Submit
Most of the control elements have the ability to specify if that element can be edited by the user before or after it is submitted. For example, perhaps you want the homeowner to specify the project’s description, but only prior to being submitted and not afterwards. In that case, you could set the project description to Read-Only After User Submit.
Mapping
Most of the control elements have the ability to map to the Arc Application. It is recommended that you do not modify or change any of these elements that are already set up and mapped. Please consult with Smartwebs personnel prior to any modification of these elements.
Is Required
You can specify if the element must be filled out or selected prior to submittal. If checked, the user can only submit their form once they have supplied the appropriate information.
Show Only When
This is a really cool feature where you can make it so that a particular form element only shows under a specific condition that is met from another control element. For example, if you wanted to show a warning such as “Please be sure to get permission from the city” if the user chose to do a landscaping project. The image to the right shows how to accomplish this:
This is a label control. Notice how you can specify the message of the label, the color of the label, and the font size. You will also click “Show Only When” and pick the control element on which the specified element (such as this message) is dependent. In our example case, the project type must be like “landscape” in order to show the warning message.
List of Controls
The below section will go over all of the options available for how you want to present the information to the homeowner in the form.
Group Control
This will group all controls below it until another group control is used. For example, in the global template there are two group controls. The first is “User Info” and it groups all controls under it until it comes to the next group control, called “Project Info”.
Editing/Changing: You can specify the group’s name, a tool tip, and whether you want the group to be collapsed when the user first comes to the form.
Advanced Editing: If you add a tooltip, you have additional options on how that tooltip is displayed and what icon you want displayed. We use glyphicons which can be found here: http://getbootstrap.com/components/
Input (Text)
This is a simply textbox control. When editing this control, you can specify if this is intended for any special purposes like an email address or a number. By default it is set to plain text.
Label
This is a text label. It can be used to provide additional information to the user. You can specify the text size and color, as well as designate if it depends on another element in order to show.
The lable does conform to HTML code, so if there is specific formatting needed, you can input the HTML code to the message and it will format it in the form.
NOTE: Only one text size can be used in a control, so if you need a header, use a second Lable control to add the header above the body of the text
Input (Checkbox)
This is a checkbox control that can be used to identify whether certain items have been received, or if the homeowner has confirmed or acknowledged something. For example: “I confirm that I have submitted all required info: [x]”
Input (Radio)
This is a list of radio buttons that can be used to choose between options. You can then make other element controls dependent on the selected option. Depending on which option is selected, other controls may appear or disappear.
Select (Dropdown)
This is a dropdown list of options. You can then make other element controls dependent on the selected option in the dropdown list. Depending on which option is selected within the dropdown list, other controls may appear or disappear.
Documents
This element control allows users to upload documents. You can, specify if the user can add or delete documents after the form has been submitted.
Links
This control allows you to place external web links on the form. This can be useful if you would like to provide additional resource links to the homeowner. Be careful using this to point to specific resources on associations’ websites if you plan to make this form available for multiple associations.
Form Designer
The form designer allows you to change the order of the controls as well edit each of the controls' content/function.
When an element control is dragged to the “drop area” it will automatically get placed at the bottom of the list.

You can then scroll down and drag that control up the list to the preferred location. You may likewise rearrange the order of existing element controls in this area by dragging them up or down the list and dropping in a new location.

We suggest saving often to avoid potential lost progress within the form.
You can also edit each element by clicking the edit button on the top right corner of the element control.

Just below the Save and Reset button you can specify the Name of the form as well as the Title and Subtitle (click the arrow button to see the title and subtitle areas).
- Name: The Name of the form will be shown to residents in the Smartwebs Resident Portal Dashboard as well as in the Link Forms section for managament users.
- Name Lable: The Name Lable will be shown to residents when they
Important: The default name of this required textbox is “Project Name”, but you can change this and your new name will appear as the label of the form name. This currently does not show on the “Form Preview” but it will show up on the form itself and is a required field.
Form Preview
This area allows you to see what the form will look like.
Although this is intended to help in your design process, the best way to see how the form functions and looks is to preview the actual form as a homeowner would. This is better explained in the “Link Forms” section.
Note: The Form Name Lable textbox will not show on the preview, but it will show up on the actual form.
Link Forms
Now you are ready to use this form for your associations. Click on the “Link Forms” tab. You’ll notice that in this example, there are no associations linked to our General Form, and one association linked to the Basic Form.
First, click the form from the Forms side on the left of the page, then use the check boxes to select the associations you wish to link to that form:
After you click “Save” you’ll see that you now have individualized links for each association. These links are very important as each unique link will the the user to the form for their association.
Links cannot be shared between associations, each association will have their own custom link, even if they are using the same basic form.
Testing the Form
At this point, you can quickly test out the form. Simply click the “Copy Link” button next to an association. Then paste the link into the URL bar on your browser.
Note: You’ll need to know a homeowner within the association so you can enter the correct credentials to test the form.
Going Live
When your forms are tested and ready to implement, you can go back to the Link Forms tab, click on the General Form, and click “Export Links to Excel”. Then you can take each individual link and paste them on the individual associations’ websites where homeowners can see them.
From here, the homeowners can then click on the link to be taken to an authentication page. They’ll need to submit their proper credentials before they will be forwarded on to the Online Submit form.
Once the user submits their project, they will receive an email with a link back to the form. The property manager will also receive an email notification stating that the homeowner submitted a project and can be found in the Staged Projects section of SmartArchitecturals. The property manager should review the submission for completeness, then change the status to “Not Voted” and click “Save” in order to send the project on to the committee.
Any documents uploaded by the homeowner via the form will show up in the document section of the Arc just like they do when a Property Manager manually uploads the project. Committee members can also review the original form submission via a link that can also be found in the Documents section of the Arc Committee Manager website.
User Authentication
The resident user will need to enter at least three characters of their address and their full ZIP code to access the form.
If multiple addresses share the three digits the homeowner entered, then it will pull up a list for them to select their correct unit.
Costs Associated with the Online Submit Form
Currently, there are no additional charges to the management associated with enabling the Arc Online Submit Form.
We can set up an online ARC for you for a fee. Please contact our support group at support@smartwebs.com.
Please note we reserve the right to refuse the setup of extremely complex forms.