The Smartwebs Approval Engine allows you to invoices, checks, and reports. Additionally, you can setup multiple approval levels, before an approved item, such as check, goes out the door.
Board Members or Managers that are approving invoices can also approve invoices directly within the Accounting module in the invoice screen.
Setting up check signers
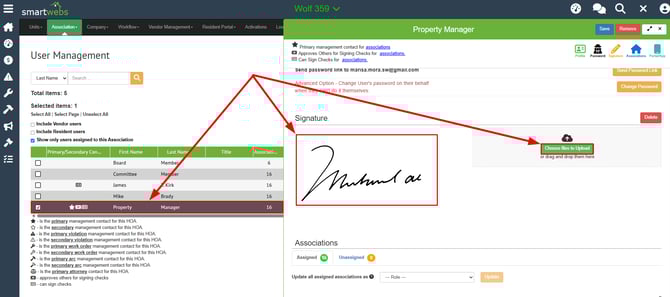
Each user that you want to approval invoices will need to have a signature on file. This can be added under the User Management screen.
- Manage > Association > Association Users
- Click on the user & upload file under Signature.
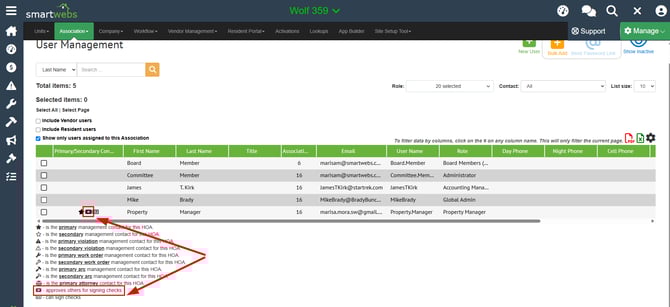
Once the users that want to approve invoices have a signature on file, you can mark them as check signers for certain associations. The only users who have access to do this would be those who are marked to "Approve others for signing checks", as indicated by the proper icon in the User Management section.
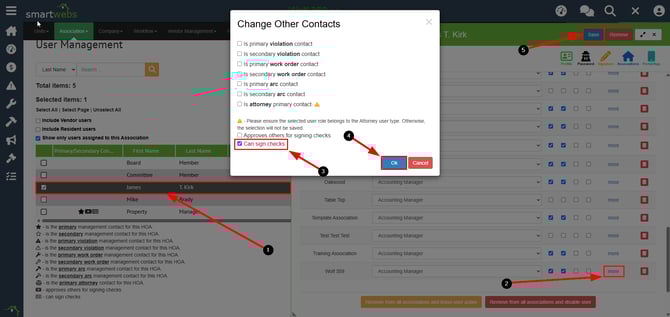
To add a user as a Check Signer for an Association, the user who is able to approve others for signing checks will need to:
- Navigate to User Management and select the user they wish to add as a check signer
- Scroll down until you see the association you wish to add them as a check signer in and select "More" under the "Other contacts" column.
- Select the checkbox titled "Can sign checks"
- Select "OK"
- Select "Save"
Any Check Signers for an association will be seen with the proper icon in the User Management section titled "Can sign checks".

Setting up the Approval Engine
Choose the association you'd like to configure. On the left side, hover over the Approval Engine icon > Setup and then click Approval Groups.
If you click on Approvals tab, you'll see the default approval levels we setup for you.
To create a copy, you'll click the Create copy button (yellow arrow in screenshot below). To create new, you'll click the + button (green arrow below)
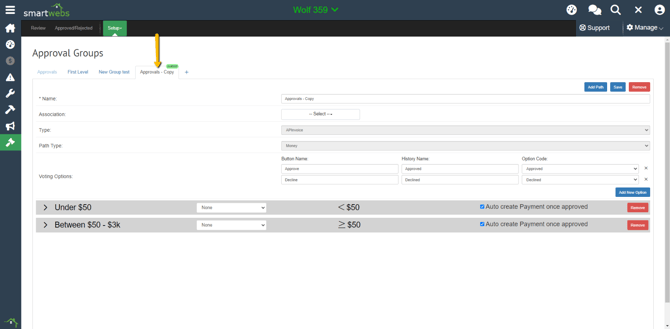
You can rename this approval. I'm going to call mine "[Management Company Name] - Invoice Approvals".
In the Association dropdown, you'll checkmark the associations who will use this approval workflow. For our example, all associations will use this workflow, so we'll checkmark all boxes.
The Voting Options allows you to customize the available buttons. In this example, there will be two buttons available: Approved and Declined.![]()
Next, let's look at each level of approvals. The first level is invoice amounts under $50. Click the arrow to expand and view details.
This level is set up to require one vote from any one of the following role types: Administrators, Community Manager or Global Admin. Once the invoice is approved, the payment for the invoice will be automatically created.
The second approval group are invoices greater than above $50. These invoices require two votes. One vote from Level 1 user ( in this example, a global admin) and one vote from Level 2 user (Board + Financial user).
After you make the appropriate changes to the approver levels, click Save.
Set Payables in General Options
The last step is to set your payables integration. You can do this by going to Accounting > General Options and selecting SmartPayables from the AP Integration dropdown.
Click Save.

Approving Invoices
Now that you have completed the setup, it's time to start entering and approving your invoices.
Go to Accounting > Payables > Invoices
Click Add Invoice
Enter the invoice information and click Create.
This invoice is $413, so it will need two approvers - one Global Admin and one Board + Financials approval. The status will chance to Approval Pending.
The Global Admin will log in and go to Approval Engine > Review. Then click on the line item to review.
If all looks correct, they'll select Approve.
Now, it's time for the Board Approval. The Board + Financial user will log in and perform the same approval. After each level of approvals, the invoice will post and ready to be paid.