---
title: User Guide - Create & Manage Posts
description: "Add Community Posts to a Page\n\nBefore residents can access your posts, add the Community Posts section to the page where you want the posts to appear.\n\nNavigate to Configuration > Pages > Select Page.\n\n1. Add the Community Posts section: On the page configuration screen, drag and drop Community Posts onto the page.\n\n2. Customize the section: Update the Section Name, Display Name, and Description if desired. The Display Name appears in the navigation sidebar, while the Description appears below the title.\n\n\n\n\n3. Save your changes: Click Save to add the section to the page.\n\nTIP\nKeep the Display Name short and easy to recognize—for example, “Posts / News.” Use the Description to briefly explain what residents will find in this area.\n\n\n\n\nCreate and Manage Topics\n\nTopics must be created before you can create a new post. Topics help organize posts and control whether the content is available to the public or only to users who are logged in.\n\nOpen Manage Topics: From the Community Posts area, click Manage Topics.\n\n\n\n\nAdd a topic: Click Add Topic.\n\n\n\n\nConfigure the topic: Enter a Topic Name and Description. You can also select a color, if desired, and choose whether the topic is visible to all users.\n\nVisibility: When a topic is visible to all users, anyone who visits your site can view posts under that topic. When it is not visible to all users, visitors must log in with their Smartwebs credentials to view the posts.\n\nPosts can also be configured as resident-view-only when they are placed under topics that are not publicly visible.\n\nCreate a Post\n\nPosts can be created or managed from the Configuration or Admin area. To begin, click Create Post.\n\n\n\n\nSelect the topic: Choose the topic where the post should appear.\nEnter the title: Create a clear, descriptive title that tells readers what the post is about.\nSet visibility: Choose whether the post should be visible to the public or only to residents.\nAdd the post content: Enter the body of the post using the available editor tools.\n\nBEST PRACTICE\nUse a short title, place the most important information near the beginning of the post, and break longer updates into short paragraphs for easier reading.\n\n\n\n\nConfigure Dates, Comments & Images\n\nAfter entering your post content, you can control when the post is visible, who can comment, and whether to include an image.\n\nSet a start and end date: Add start and end dates if desired. If you want the post to remain visible until it is manually removed, leave the date fields blank.\nChoose comment permissions: Decide who should be able to comment on the post.\nAdd an image: Upload an image to accompany the post. \n\nIMAGE RECOMMENDATION\nFor the best fit within the post layout, prepare images at 1800 × 850 pixels. This wide format helps important graphics display cleanly without unnecessary cropping.\n\n\n\n\nManage Posts\n\nYou can manage an existing post by clicking the three-dot menu on the post.\n\nUse the available post management options to make changes to an existing post as needed.\n\n\n\n\n\n\n\ninteracting with Posts\n\nWhen a post is configured to allow commenting, users can interact with it in several ways. Depending on the post settings, users can:\n\nLeave comments\nLike posts\nDislike posts\nFavorite posts\n\nQUICK CHECK BEFORE PUBLISHING\nConfirm the topic, visibility, dates, comment settings, and image before publishing. This helps ensure the post reaches the intended audience and displays as expected."
---
[Skip to content](https://solutions.smartwebs.com/en-us/smartwebs-solutions/user-guide-create-manage-posts#main-content)
English - United States
Show submenu for translations

- [Smartwebs Solutions Home](https://solutions.smartwebs.com/)
- [Contact Us](https://share.hsforms.com/2VBrljHAiSeCkcUy_-IEe_Aq0yoc)
- [Manage Tickets](https://support.smartwebs.com/tickets-view)
Open main navigation
Close main navigation
- [Smartwebs Solutions Home](https://solutions.smartwebs.com/)
- [Contact Us](https://share.hsforms.com/2VBrljHAiSeCkcUy_-IEe_Aq0yoc)
- [Manage Tickets](https://support.smartwebs.com/tickets-view)
- English - United States
Show submenu for translations
- [Contact Us](https://share.hsforms.com/2VBrljHAiSeCkcUy_-IEe_Aq0yoc)
[Contact Us](https://share.hsforms.com/2VBrljHAiSeCkcUy_-IEe_Aq0yoc)
How can we help you?
- There are no suggestions because the search field is empty.
1. [Smartwebs Solutions](https://solutions.smartwebs.com/en-us/smartwebs-solutions?hsLang=en-us)
2. [Lifestyle](https://solutions.smartwebs.com/en-us/smartwebs-solutions/lifestyle?hsLang=en-us)
August 19, 2026
# User Guide - Create & Manage Posts
## Use Community Posts to share information with your community. This guide covers page setup, topics, post creation, visibility, scheduling, images, management, and resident interaction.
### **Add Community Posts to a Page**
Before residents can access your posts, add the Community Posts section to the page where you want the posts to appear.
Navigate to Configuration \> Pages \> Select Page.
**1. Add the Community Posts section:** On the page configuration screen, drag and drop Community Posts onto the page.
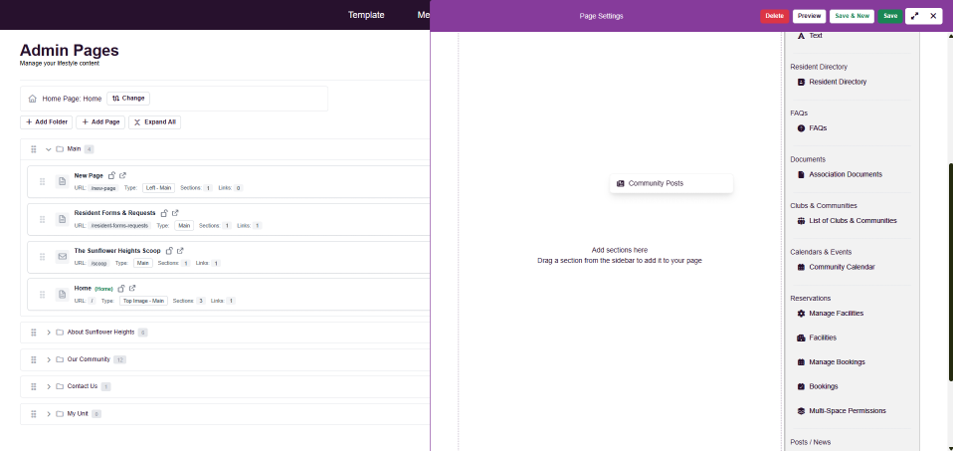
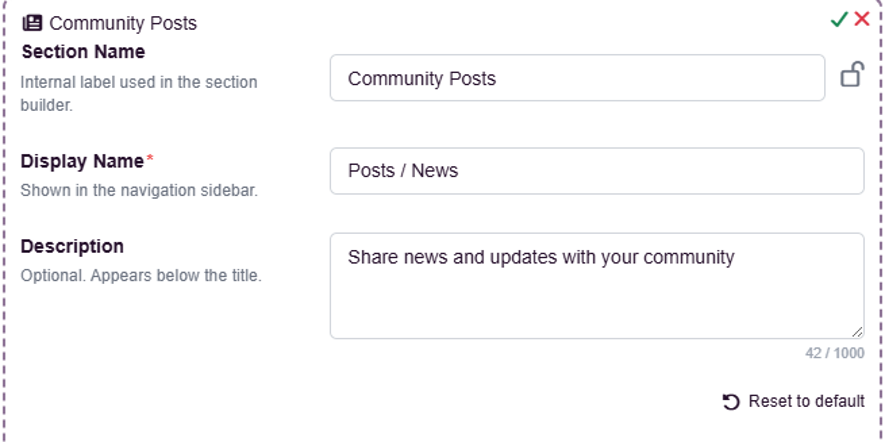
**2. Customize the section:** Update the Section Name, Display Name, and Description if desired. The Display Name appears in the navigation sidebar, while the Description appears below the title.
**
**3. Save your changes:** Click Save to add the section to the page.
> TIP
> Keep the Display Name short and easy to recognize—for example, “Posts / News.” Use the Description to briefly explain what residents will find in this area.
### **Create and Manage Topics**
Topics must be created before you can create a new post. Topics help organize posts and control whether the content is available to the public or only to users who are logged in.
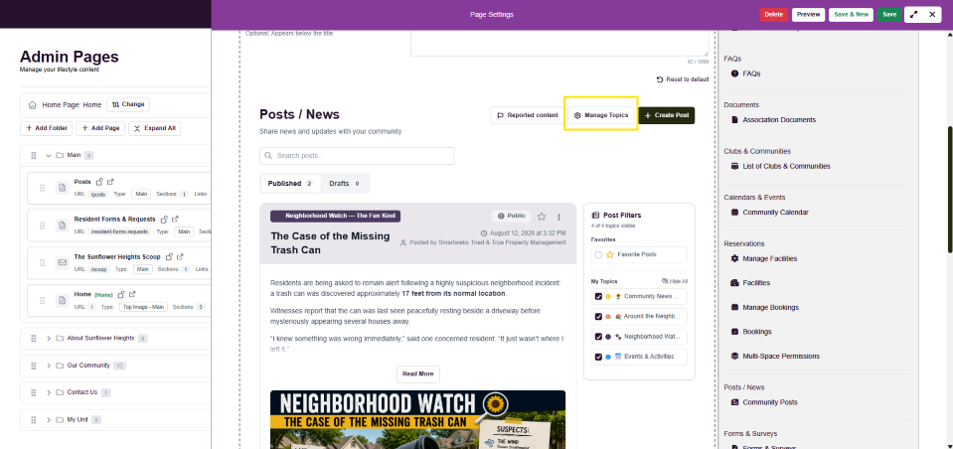
1. **Open Manage Topics:** From the Community Posts area, click Manage Topics.
**
1. **Add a topic:** Click Add Topic.
*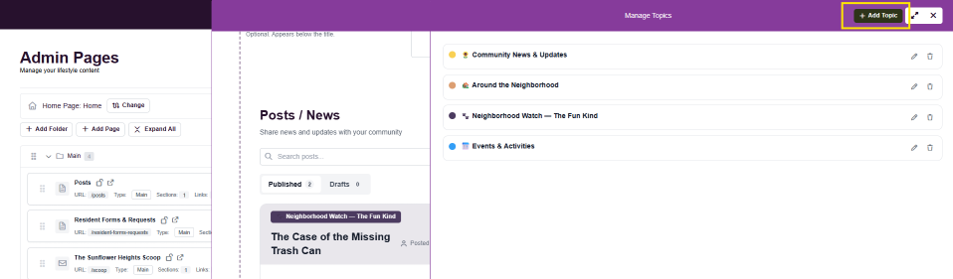*
1. **Configure the topic:** Enter a Topic Name and Description. You can also select a color, if desired, and choose whether the topic is visible to all users.
**Visibility:** When a topic is visible to all users, anyone who visits your site can view posts under that topic. When it is not visible to all users, visitors must log in with their Smartwebs credentials to view the posts.
Posts can also be configured as resident-view-only when they are placed under topics that are not publicly visible.
**Create a Post**
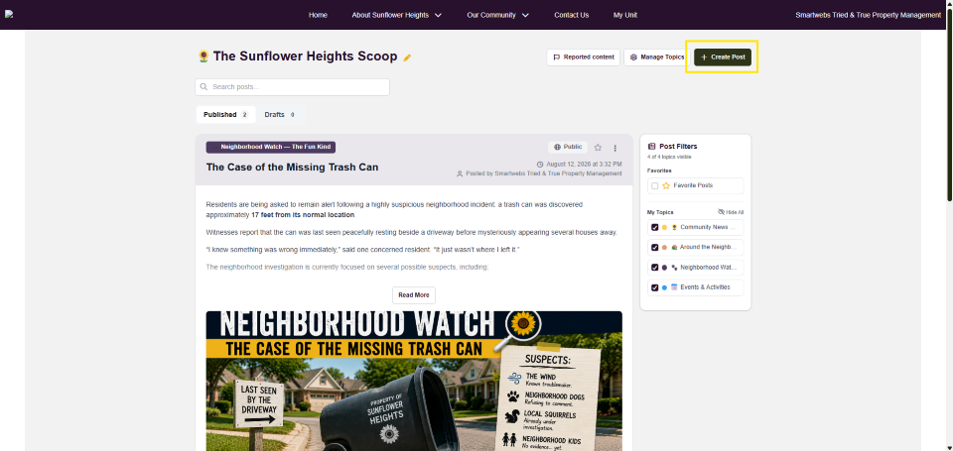
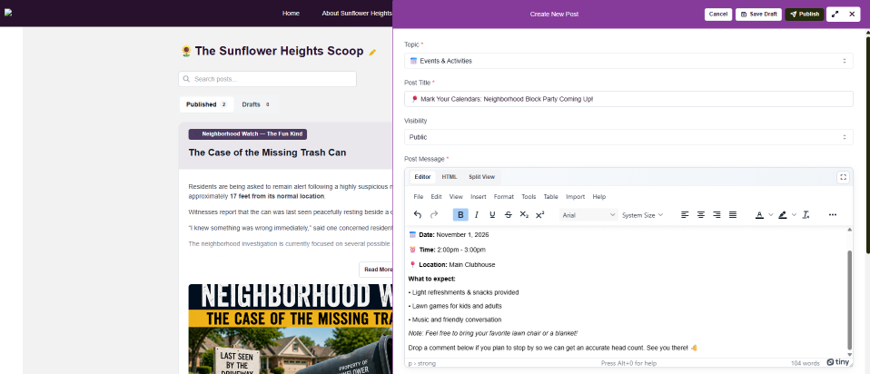
Posts can be created or managed from the Configuration or Admin area. To begin, click Create Post.
**
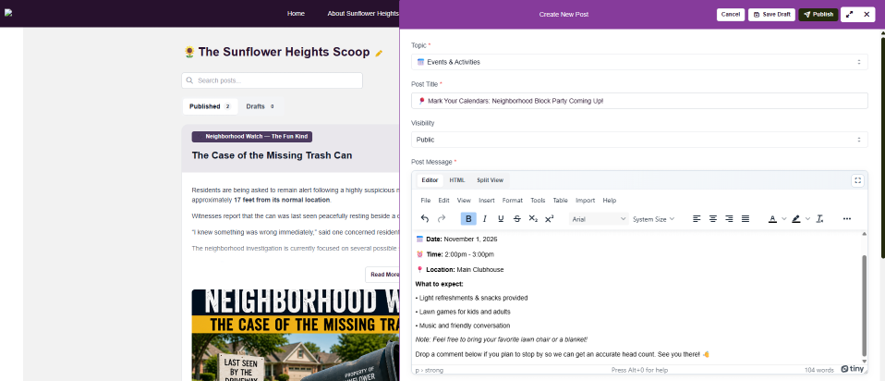
1. **Select the topic:** Choose the topic where the post should appear.
2. **Enter the title:** Create a clear, descriptive title that tells readers what the post is about.
3. **Set visibility:** Choose whether the post should be visible to the public or only to residents.
4. **Add the post content:** Enter the body of the post using the available editor tools.
> BEST PRACTICE
> Use a short title, place the most important information near the beginning of the post, and break longer updates into short paragraphs for easier reading.
### **Configure Dates, Comments & Images**
After entering your post content, you can control when the post is visible, who can comment, and whether to include an image.
1. **Set a start and end date:** Add start and end dates if desired. If you want the post to remain visible until it is manually removed, leave the date fields blank.
2. **Choose comment permissions:** Decide who should be able to comment on the post.
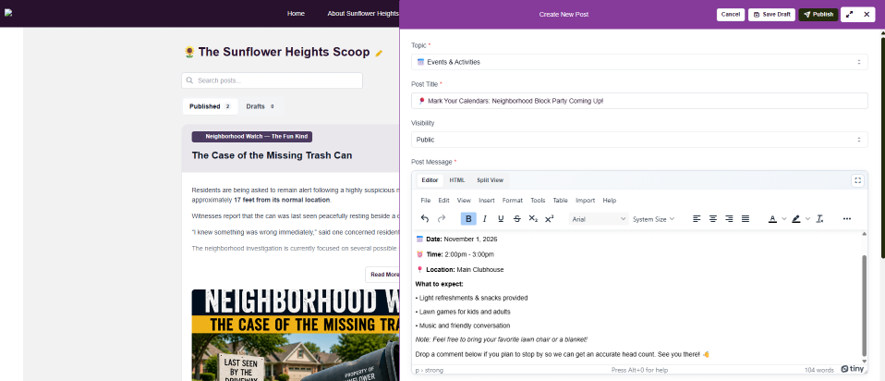
3. **Add an image:** Upload an image to accompany the post.
> IMAGE RECOMMENDATION
> For the best fit within the post layout, prepare images at 1800 × 850 pixels. This wide format helps important graphics display cleanly without unnecessary cropping.
### **Manage Posts**
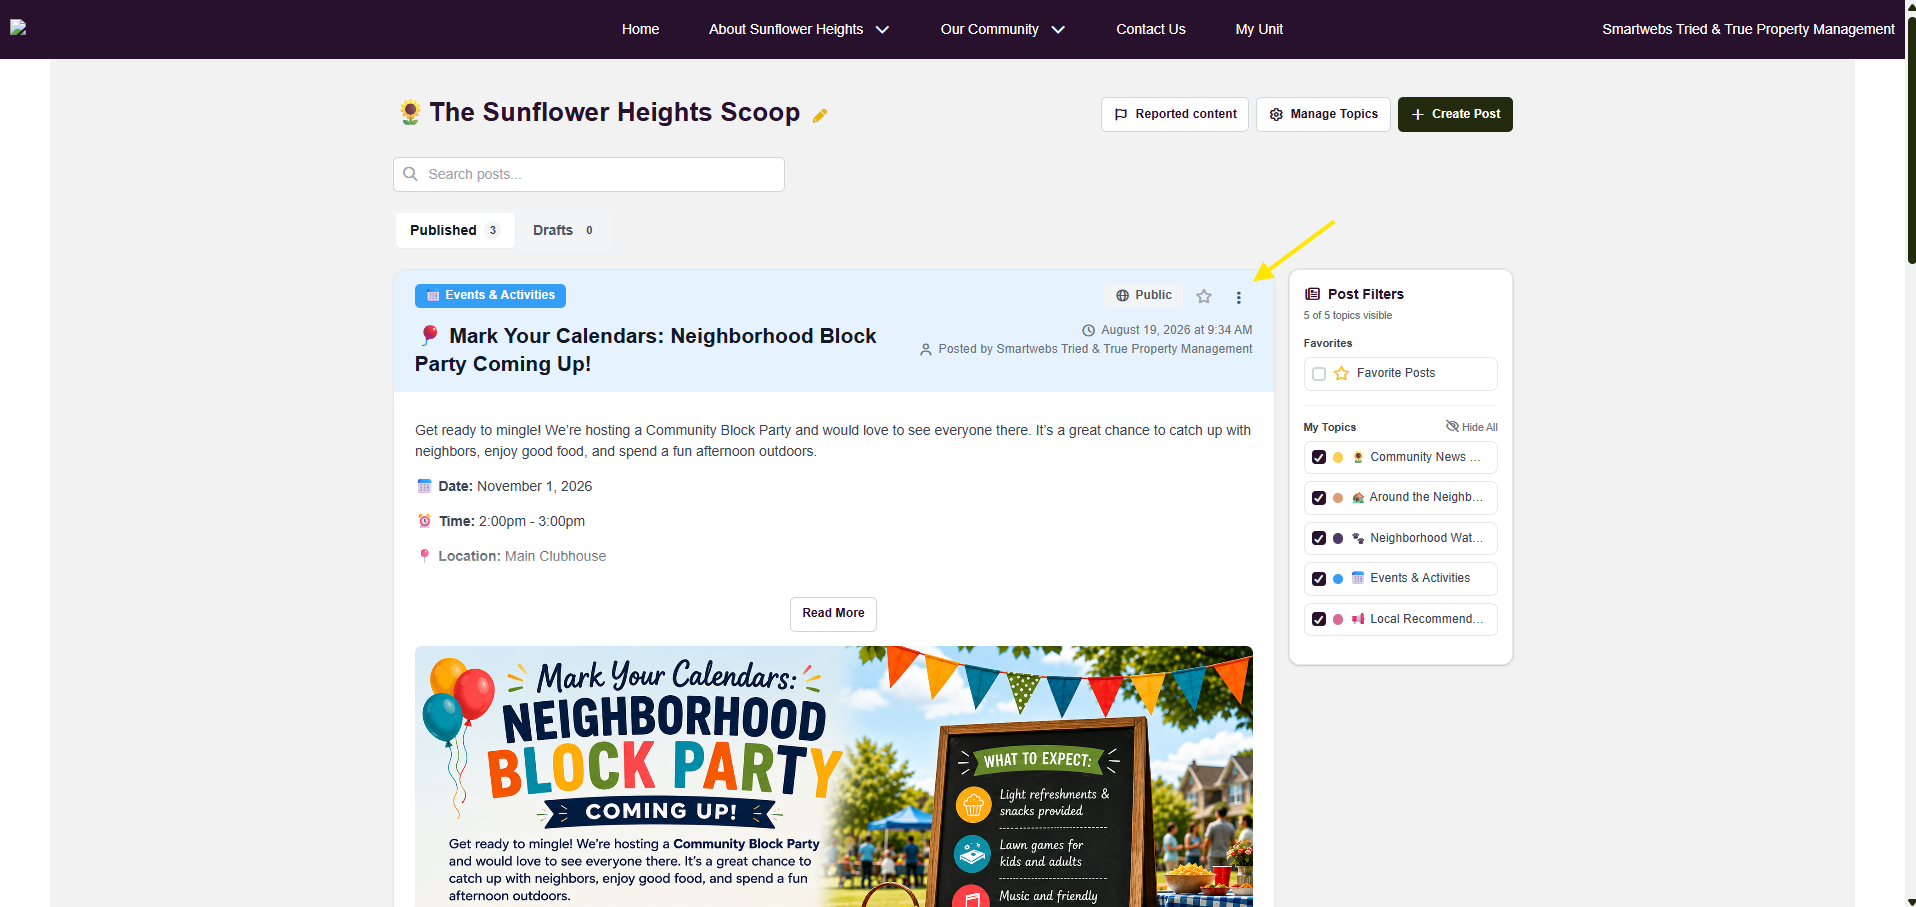
You can manage an existing post by clicking the three-dot menu on the post.
Use the available post management options to make changes to an existing post as needed.
**
**interacting with Posts**
When a post is configured to allow commenting, users can interact with it in several ways. Depending on the post settings, users can:
- Leave comments
- Like posts
- Dislike posts
- Favorite posts
> QUICK CHECK BEFORE PUBLISHING
> Confirm the topic, visibility, dates, comment settings, and image before publishing. This helps ensure the post reaches the intended audience and displays as expected.
- [Accounting](https://solutions.smartwebs.com/en-us/smartwebs-solutions/accounting?hsLang=en-us#main-content)
- [1099's](https://solutions.smartwebs.com/en-us/smartwebs-solutions/accounting?hsLang=en-us#1099s)
- [General](https://solutions.smartwebs.com/en-us/smartwebs-solutions/accounting?hsLang=en-us#general)
- [General Ledger](https://solutions.smartwebs.com/en-us/smartwebs-solutions/accounting?hsLang=en-us#general-ledger)
- [Receivables](https://solutions.smartwebs.com/en-us/smartwebs-solutions/accounting?hsLang=en-us#receivables)
- [Payables](https://solutions.smartwebs.com/en-us/smartwebs-solutions/accounting?hsLang=en-us#payables)
- [Banking & Reconciliation](https://solutions.smartwebs.com/en-us/smartwebs-solutions/accounting?hsLang=en-us#banking-reconciliation)
- [Configuration & Setup](https://solutions.smartwebs.com/en-us/smartwebs-solutions/accounting?hsLang=en-us#configuration-setup)
- [Merchant Services](https://solutions.smartwebs.com/en-us/smartwebs-solutions/accounting?hsLang=en-us#merchant-services)
- [Reports](https://solutions.smartwebs.com/en-us/smartwebs-solutions/accounting?hsLang=en-us#reports)
- [Billing](https://solutions.smartwebs.com/en-us/smartwebs-solutions/accounting?hsLang=en-us#billing)
- [Payments & Deposits](https://solutions.smartwebs.com/en-us/smartwebs-solutions/accounting?hsLang=en-us#payments-deposits)
- [Homeowner Charges](https://solutions.smartwebs.com/en-us/smartwebs-solutions/accounting?hsLang=en-us#homeowner-charges)
- [Statements](https://solutions.smartwebs.com/en-us/smartwebs-solutions/accounting?hsLang=en-us#statements)
- [Collections](https://solutions.smartwebs.com/en-us/smartwebs-solutions/accounting?hsLang=en-us#collections)
- [Security Deposits](https://solutions.smartwebs.com/en-us/smartwebs-solutions/accounting?hsLang=en-us#security-deposits)
- [Administration](https://solutions.smartwebs.com/en-us/smartwebs-solutions/accounting?hsLang=en-us#administration)
- [Administrative](https://solutions.smartwebs.com/en-us/smartwebs-solutions/administrative?hsLang=en-us#main-content)
- [Owner Unit Management](https://solutions.smartwebs.com/en-us/smartwebs-solutions/administrative?hsLang=en-us#owner-unit-management)
- [User Management](https://solutions.smartwebs.com/en-us/smartwebs-solutions/administrative?hsLang=en-us#user-management)
- [Roles and Rights](https://solutions.smartwebs.com/en-us/smartwebs-solutions/administrative?hsLang=en-us#roles-and-rights)
- [Email Notification Preferences](https://solutions.smartwebs.com/en-us/smartwebs-solutions/administrative?hsLang=en-us#email-notification-preferences)
- [Satellite Offices](https://solutions.smartwebs.com/en-us/smartwebs-solutions/administrative?hsLang=en-us#satellite-offices)
- [Reporting](https://solutions.smartwebs.com/en-us/smartwebs-solutions/administrative?hsLang=en-us#reporting)
- [Document Management](https://solutions.smartwebs.com/en-us/smartwebs-solutions/administrative?hsLang=en-us#document-management)
- [Security](https://solutions.smartwebs.com/en-us/smartwebs-solutions/administrative?hsLang=en-us#security)
- [Letter Parameters](https://solutions.smartwebs.com/en-us/smartwebs-solutions/administrative?hsLang=en-us#letter-parameters)
- [Zero Touch Mailing Service](https://solutions.smartwebs.com/en-us/smartwebs-solutions/administrative?hsLang=en-us#zero-touch-mailing-service)
- [Association Setup](https://solutions.smartwebs.com/en-us/smartwebs-solutions/administrative?hsLang=en-us#association-setup)
- [Vendor Management](https://solutions.smartwebs.com/en-us/smartwebs-solutions/administrative?hsLang=en-us#vendor-management)
- [Email and Custom Domains](https://solutions.smartwebs.com/en-us/smartwebs-solutions/administrative?hsLang=en-us#email-and-custom-domains)
- [Data Storage](https://solutions.smartwebs.com/en-us/smartwebs-solutions/administrative?hsLang=en-us#data-storage)
- [Support](https://solutions.smartwebs.com/en-us/smartwebs-solutions/administrative?hsLang=en-us#support)
- [Preferences](https://solutions.smartwebs.com/en-us/smartwebs-solutions/administrative?hsLang=en-us#preferences)
- [HOA and Data Transfers](https://solutions.smartwebs.com/en-us/smartwebs-solutions/administrative?hsLang=en-us#hoa-and-data-transfers)
- [Architecturals](https://solutions.smartwebs.com/en-us/smartwebs-solutions/architecturals?hsLang=en-us#main-content)
- [Committee Member Guides](https://solutions.smartwebs.com/en-us/smartwebs-solutions/architecturals?hsLang=en-us#committee-member-guides)
- [Board Member Guides](https://solutions.smartwebs.com/en-us/smartwebs-solutions/architecturals?hsLang=en-us#board-member-guides)
- [Online Submit Forms](https://solutions.smartwebs.com/en-us/smartwebs-solutions/architecturals?hsLang=en-us#online-submit-forms)
- [Arc Project Notifications](https://solutions.smartwebs.com/en-us/smartwebs-solutions/architecturals?hsLang=en-us#arc-project-notifications)
- [Arc CCRs and Project Types](https://solutions.smartwebs.com/en-us/smartwebs-solutions/architecturals?hsLang=en-us#arc-ccrs-and-project-types)
- [Arc Project Statuses and Expirations](https://solutions.smartwebs.com/en-us/smartwebs-solutions/architecturals?hsLang=en-us#arc-project-statuses-and-expirations)
- [Arc Letters](https://solutions.smartwebs.com/en-us/smartwebs-solutions/architecturals?hsLang=en-us#arc-letters)
- [Arc Admin, Settings, and Reports](https://solutions.smartwebs.com/en-us/smartwebs-solutions/architecturals?hsLang=en-us#arc-admin-settings-and-reports)
- [Arc Projects](https://solutions.smartwebs.com/en-us/smartwebs-solutions/architecturals?hsLang=en-us#arc-projects)
- [Arc Project Applications](https://solutions.smartwebs.com/en-us/smartwebs-solutions/architecturals?hsLang=en-us#arc-project-applications)
- [Board and Committee Admin](https://solutions.smartwebs.com/en-us/smartwebs-solutions/board-and-committee-admin?hsLang=en-us#main-content)
- [Meeting Minutes](https://solutions.smartwebs.com/en-us/smartwebs-solutions/board-and-committee-admin?hsLang=en-us#meeting-minutes)
- [Communications](https://solutions.smartwebs.com/en-us/smartwebs-solutions/communications?hsLang=en-us#main-content)
- [Mass Communications](https://solutions.smartwebs.com/en-us/smartwebs-solutions/communications?hsLang=en-us#mass-communications)
- [Workflow](https://solutions.smartwebs.com/en-us/smartwebs-solutions/communications?hsLang=en-us#workflow)
- [Security](https://solutions.smartwebs.com/en-us/smartwebs-solutions/communications?hsLang=en-us#security)
- [General](https://solutions.smartwebs.com/en-us/smartwebs-solutions/general?hsLang=en-us#main-content)
- [Frequently Asked Questions](https://solutions.smartwebs.com/en-us/smartwebs-solutions/general?hsLang=en-us#frequently-asked-questions)
- [Lifestyle](https://solutions.smartwebs.com/en-us/smartwebs-solutions/lifestyle?hsLang=en-us)
- [Mobile Applications](https://solutions.smartwebs.com/en-us/smartwebs-solutions/mobile-applications?hsLang=en-us#main-content)
- [Offline App](https://solutions.smartwebs.com/en-us/smartwebs-solutions/mobile-applications?hsLang=en-us#offline-app)
- [Portal App](https://solutions.smartwebs.com/en-us/smartwebs-solutions/mobile-applications?hsLang=en-us#portal-app)
- [Mobile Online App](https://solutions.smartwebs.com/en-us/smartwebs-solutions/mobile-applications?hsLang=en-us#mobile-online-app)
- [iOS Devices](https://solutions.smartwebs.com/en-us/smartwebs-solutions/mobile-applications?hsLang=en-us#ios-devices)
- [Android devices](https://solutions.smartwebs.com/en-us/smartwebs-solutions/mobile-applications?hsLang=en-us#android-devices)
- [FAQ](https://solutions.smartwebs.com/en-us/smartwebs-solutions/mobile-applications?hsLang=en-us#faq)
- [Release Notes](https://solutions.smartwebs.com/en-us/smartwebs-solutions/release-notes?hsLang=en-us#main-content)
- [Office Site Releases](https://solutions.smartwebs.com/en-us/smartwebs-solutions/release-notes?hsLang=en-us#office-site-releases)
- [Application Releases](https://solutions.smartwebs.com/en-us/smartwebs-solutions/release-notes?hsLang=en-us#application-releases)
- [Resident Portal](https://solutions.smartwebs.com/en-us/smartwebs-solutions/resident-portal?hsLang=en-us#main-content)
- [Resident Guides](https://solutions.smartwebs.com/en-us/smartwebs-solutions/resident-portal?hsLang=en-us#resident-guides)
- [Admin Guides](https://solutions.smartwebs.com/en-us/smartwebs-solutions/resident-portal?hsLang=en-us#admin-guides)
- [Violations](https://solutions.smartwebs.com/en-us/smartwebs-solutions/violations?hsLang=en-us#main-content)
- [Frequently Asked Questions](https://solutions.smartwebs.com/en-us/smartwebs-solutions/violations?hsLang=en-us#frequently-asked-questions)
- [Violation Letters](https://solutions.smartwebs.com/en-us/smartwebs-solutions/violations?hsLang=en-us#violation-letters)
- [Violation CCRs](https://solutions.smartwebs.com/en-us/smartwebs-solutions/violations?hsLang=en-us#violation-ccrs)
- [Violation Policies](https://solutions.smartwebs.com/en-us/smartwebs-solutions/violations?hsLang=en-us#violation-policies)
- [Mapping Units in Smartwebs](https://solutions.smartwebs.com/en-us/smartwebs-solutions/violations?hsLang=en-us#mapping-units-in-smartwebs)
- [Setup and Configuration](https://solutions.smartwebs.com/en-us/smartwebs-solutions/violations?hsLang=en-us#setup-and-configuration)
- [Reporting](https://solutions.smartwebs.com/en-us/smartwebs-solutions/violations?hsLang=en-us#reporting)
- [Work Orders](https://solutions.smartwebs.com/en-us/smartwebs-solutions/work-orders?hsLang=en-us#main-content)
- [Work Order Management](https://solutions.smartwebs.com/en-us/smartwebs-solutions/work-orders?hsLang=en-us#work-order-management)
- [Vendor Management](https://solutions.smartwebs.com/en-us/smartwebs-solutions/work-orders?hsLang=en-us#vendor-management)
- [Flyers](https://solutions.smartwebs.com/en-us/smartwebs-solutions/flyers?hsLang=en-us#main-content)
- [Lifestyle](https://solutions.smartwebs.com/en-us/smartwebs-solutions/flyers?hsLang=en-us#lifestyle)
- [Resale](https://solutions.smartwebs.com/en-us/smartwebs-solutions/resale?hsLang=en-us)
# Smartwebs
1015 S Mays St, Round Rock, TX 78664
[512-218-9996](tel:512-218-9996)
[mailto:support@smartwebs.com](mailto:support@smartwebs.com)
Copyright © 2026, Smartwebs